While researching my option’s to deal with a rusty petrol tank problem that I had with the Gamma, I came upon a few bit’s of info suggesting electrolysis as a good way to deal with the rust. As I looked deeper into it however I found a lot of differing approaches to it and while the principle behind it was common, some of the methods being suggested seemed a little ill advised.
This variation in information has led me to write this bit about what I have done with electrolytic rust removal that it may help someone with a similar rust problem and without I hope adding to the confusion.
The problem.
The rusting of steel parts is of coarse the problem. 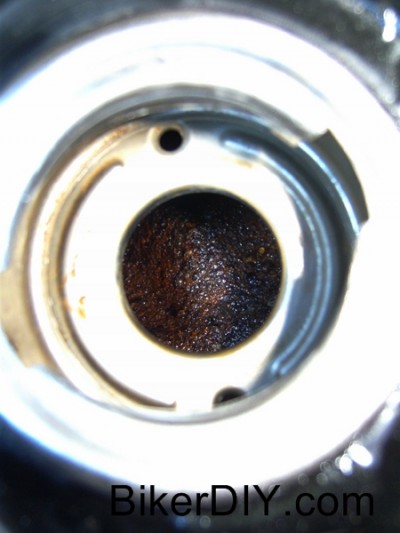 But in particular the rusting of hard to get at area’s on components made of light stuff such as the inside of the petrol tank is where the electrolytic approach may prove particularly useful. Add to this that it does not effect surrounding good steel and can be done at home for small money all goes I think to make it a method worth a DIY’er considering when faced with the dreaded rust problem.
I chose not to use this method for the petrol tank rust problem for reasons I explain (or will explain) elsewhere, but the DIY electrolysis idea still intrigued me, so I looked into it a bit more and I did use it for several other parts along the way.
The Basics behind the process .
That unsightly rust we so dislike is the result of chemical oxidation/reduction process’ combining oxygen molecules with the iron molecules in the steel. During the chemical process electrons are passed between the various molecules. The process requires the presence of water to conduct the electrons and is accelerated by the presence of salt’s which is the reason rusting happens faster at the coast I suppose.
The key to this for us is the movement of electrons between molecules in the rusting process. It means we can take a sacrificial piece of iron and with the help of an electrical current and a conductive medium “move” good iron molecules from our sacrificial piece of iron back into the surface rust of our part while at the same time “moving” oxygen molecules and therefore the rust to the sacrificial piece of iron (hence it being called the sacrificial piece of iron). I am using the term “move” for simplicity as in fact a huge amount goes on in the middle, a lot of which is beyond my grasp of chemistry, but the net effect is as if the oxygen molecules have been removed from our rusty part to our sacrificial iron electrode (and therefore rusting it) while simultaneously moving iron molecules back to our rusty part (restoring good iron).
Points to note if you are considering this method as a remedy for your rust problem.
1) Any metal other than iron/steel involved in the process may have undesirable effects. These undesirable effects can range from just making for a “messy process” all the way to may have serious health implication’s to those exposed, so if you have any doubt about whether or not other metals are present, especially chrome or stainless steel in the part or the sacrificial electrode then my advice is just don’t put them into a process like this, it’s not worth the possible health risk. Metals like copper or zinc will be dissolved and make a mess, also you may end up partially plating your part with them. Stainless steel or more specifically Chromium (present in stainless steel) can apparently give rise to the production of Hexavalent Chromium. Hexavalent Chromium is a known carcinogen. You might have heard of it as the poison at the centre of the Erin Brokovich movie. Aluminium will be attacked by the alkaline solution and corroded away.
2) This process, depending on your set up, can take time. It doesn’t however need much supervision during that time except to maintain the water level which through evaporation and being used up in the process will drop.
3) This method will not restore lost structural integrity in any appreciable way, so if your tank (for example) is already rusted through to the outside this is probably not the best fix for you. That said, it should also be noted that this method won’t have any adverse effect at all on any good iron/steel still in the part while it removes the rusted bits. This is an advantage over a lot of rust removal methods, which while chemically or mechanically removing rust, also as collateral damage remove or otherwise damage some of the good metal in the process.
4) Most paints will be softened and lifted by the solution and also by the gas bubble production at the part. I saw this as an advantage as it meant I had a completely cleaned part for respraying, but if your trying for a rust fix on a localised area of an otherwise good part then maybe this would be less useful.
What you need.
1) A plastic water tight but not gas tight container. Size wise it basically needs to be bigger than the part your thinking of treating, with free space for your sacrificial piece(s). My first run was in a 2 litre plastic bucket with a small part (the battery bracket from a gamma).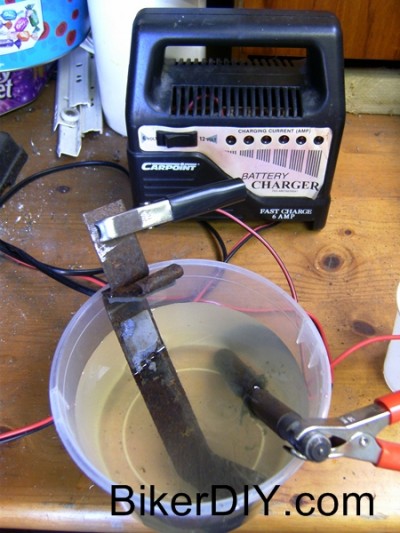
My current set up is a 100 litre plastic rubbish bin bought for €10 at Woodies DIY . On the bigger side I have read articles where individuals have claimed they used kid’s paddling pools so as to treat the frame of a car trailer in one go and also purpose built tank’s which contained thousands of litres of water and used the current from an arc welder to supply the required massive current.
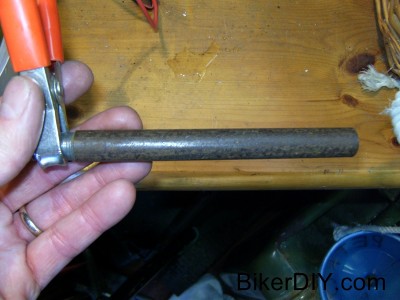
So basic requirement’s in the end are, that it is non conductive to electricity and non reactive to an alkaline solution and big enough for your needs. As far as your needs go bear in mind also that you don’t have to treat all of the part at one time as there will be no overlap marks to speak of. For example, you can do a little more than half the part and then after it’s completed, turn it over to submerge the rest for treatment. This is what I did with my battery bracket in the picture.
2) A low voltage direct current (DC) electricity supply. A car battery charger is a commonly available choice that should suit most needs. I am however referring to the “old school” copper wound transformer type rather than the newer electronic smart chargers as some of the fancier one’s will detect the connected set up and see it as a bad battery and therefore not allow proper current flow. I am using a 24dc power supply I had lying around and it has done fine. Any old DC power “brick” from a no longer used piece of household electronics might be used also so long as you can get at the DC leads to connect them where you need them and it can supply the current your set up will need. As far as to how much current will flow in your process that depends on several thing’s. a) The voltage you are applying, b) The conductivity of the fluid which is effected by the concentration of washing powder up to a certain maximum point and by the distance between the part and the sacrificial piece(s). c) the surface area exposed of the rusted part and the sacrificial piece(s). To give you an idea, my rubbish bin set up with a single length of 1/2″ re bar as sacrificial submerged in 50cm of solution used to threat the same battery bracket almost completely submerged 25cm away drew 150mA (.15 amps) from the 12 volt battery charger. By changing to a 24 volt supply the current was doubled to 300mA (.3 amps) and the time taken to threat the part reduced. Increasing the surface area’s with bigger parts or more/bigger sacrificial pieces will increase the current drawn at a given voltage, as will reducing the distance between the part and the sacrificial pieces. And vice versa reducing the surface area as with smaller parts and pieces and/or increasing the distance between them and the sacrificial probe will reduce the current.
For any given part being treated the current flowing directly corresponds to the rate at which rust is removed so the higher the current the sooner the part will be ready.
3) Washing soda. Something I thought was readily available on the supermarket shelf until I went looking for it. I eventually found it, when looking for something completely different, in Dunnes stores.
There are lot’s of claims and suggestions for different salts to add to your water for different/better results from this process, but for me it is a simple choice. In the end what is required from this additive is the ability to make the solution conduct electricity, but equally important for me,my health and my environment is that it doesn’t contribute any part of it’s make up to the chemical process’s going on. For example, in some quarters it is suggested table salt is a good additive to this solution and as far as I can guess, yes the same result will be achieved (maybe even faster), but a probable by-product of this process would be chlorine (mustard) gas being produced which is unpleasant in low concentrations and harmful in high concentrations.
For the alkaline solution you will need approx 18ml (about 1.25 tablespoons) of washing soda per 4.5litres (1 uk gallon) of water. You can mix it stronger if you like (note: in a hard water area you probably should mix stronger to deal with the ions already present in the water), it won’t have any effect either way on the process but it will make the solution potentially more irritating to the eye’s and skin. If you mix less than this concentration you will decrease the conductivity of the solution which will result in an increase in the amount of time taken for a given part to be treated fully.
If you can’t find washing soda you can convert baking soda to be used instead (this is a more expensive way to go). This is done by spreading the baking soda out onto a sheet of greaseproof paper and baking it in the oven at just over 150 Celsius for an hour or so. This causes the baking soda (2NaHCO3) to decompose, releasing a water molecule and a CO2 molecule leaving washing soda (Na2Co3) and the water and carbon dioxide which exit our powder as a vapour and a gas in the heat of the oven.
What you do.
1) Take your chosen container and place it in a well ventilated area. Ventilation is important as an amount of both Hydrogen gas and oxygen gas are given off at the electrodes during the process and at the right concentrations these can be an 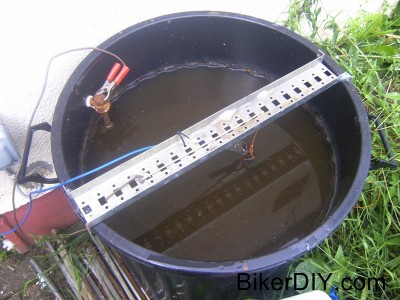 explosion risk. I have my bin set up just outside my shed door so that I can keep the high voltage bits in the dry and have just the low voltage DC leads potentially exposed to the weather.
2) Fill your container with water to a recognisable mark as you will need to make the water level back up to the same level as it is used up in the process. Add your washing soda so as to achieve the above mentioned concentration and give it a stir. At this point depending on the state of your water the washing soda may react with impurities and ions already in the water which is fine and these will ultimately form a sediment in the bottom of your container.
3) This next stage depends greatly on your part(s) but I found what worked best for all of the parts I treated was to put a support across the centre of the bin and hang the part with string into the solution with just enough out of the water to attach the crocodile clip to. I then placed my sacrificial probe(s) around the outside. I have been using 1/2″ reinforcing bar and supporting them with 1/2″ plastic pipe clips screwed to the outside of the bin. It means I can if I want/need surround the part on all sides with sacrificial probes which can ensure all areas get treated at a decent pace. This set up also had the happy result of letting me put the bin lid loosely back on top to keep the rain out while still being ventilated.
4) Note that the electricity should be disconnected at the mains before connecting or disconnecting the DC leads at the container. Hydrogen + Oxygen + spark = Kaboom. The electrical connections are simple but it is essential they are correct. Polarity is everything in this, whatever the negative lead (normally marked black) is connected to becomes the Cathode in the process and will have it’s rust removed and so this lead goes to your part. And conversely whatever the positive lead (normally marked red) is connected to becomes the Anode in the process and it will be the sacrificial piece. Obviously if you get these leads the wrong way around then you will damage your part even more and in the process save a piece of iron you don’t care about.
If all is correct then when you switch on the DC power you should almost immediately see fine bubbles being generated at both the Anode and the Cathode (see picture right and video below). Most of the activity will happen at the surfaces facing each other on the Cathode and the Anode and while this might give the impression it is a “line of sight” thing it is in fact a “path of least resistance” thing and the process will move on to the rest of the part as the nearest rust is dealt with. This is where multiple Anode’s placed around the part and all connected to the positive lead can decrease treatment time as several areas of the part are treated at once and the path to all parts is shorter.
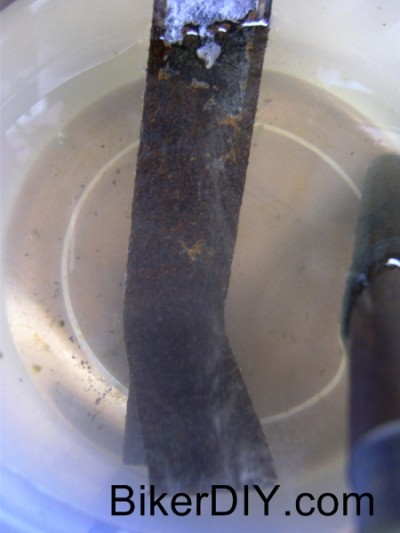
The results of my first test set up i.e. the gamma battery bracket. After almost a week I got this…

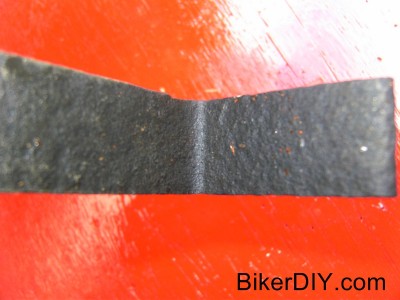
The black coating is an oxide of iron known as magnetite which is a stage iron sees on the way to rust. It can be rubbed off with a plastic pot scrub which will show you clean iron underneath. The new Iron is inclined to rust quite quickly if left wet so clean it, dry it and coat it as quickly as you can. You can see the spots of orange rust on the bracket (picture right) only an hour or two after it was taken out of the solution.
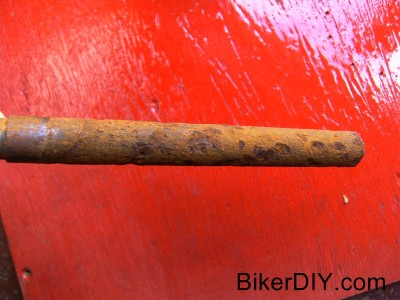
My Sacrificial Anode from my first run before and after can be seen below. As you can see significant damage has occurred to the steel part when you consider how relatively small a part was being treated.
And when I did some larger parts in the bigger bin set up I started turning 1/2″ re bar into what you see here in pretty short order.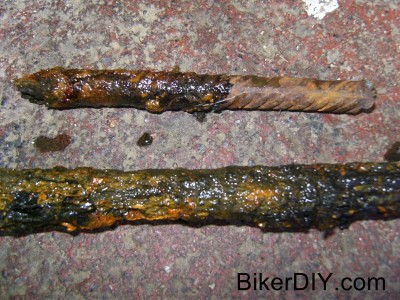
That particular bar was reduced to that state in two day’s for a Gamma foot peg to be treated.
It can, with use make for a messy tank but if all that has been used in the process is washing soda and iron bars then the solution is quite harmless and can be dumped without any environment concerns whenever you decide it is just too bad to continue using, although I have been told by some gardening friends that some ornamental plants may not like the high iron content so maybe avoid using it to water the flowerbeds.
And that’s about it on electrolytic rust removal. I have found it a cheap and easy way to remove rust from steel especially on awkward part’s like the afore mentioned foot peg where a brush or wire wheel can’t easily get in and in the end a sand (or other) blasting booth isn’t as handy or as cheap a home project to put together.


